Search for the Needle Best Classes: What to Pick for Your Run
Ultimate Farmer is the best overall class in Search for the Needle if you have it. It combines the other classes’ bonuses, so it can help throughout a run as you collect hay, sell it, and improve your tools. For a run built around Dynamite, Demolitionist is the focused pick, including when you play solo and have the tool ready to use.
You can still get plenty of value from a more common class. The best choice from your available options should help with whatever slows you down most: clearing the haystack, carrying each load, or earning enough money for upgrades. Here’s where all eight classes fit.
Best Classes at a Glance
| Class | Best for | Roll chance |
|---|---|---|
| Ultimate Farmer | Combining the other classes’ benefits | 0.1% |
| Demolitionist | Clearing hay with Dynamite | 7% |
| Forkmaster | Collecting and upgrading with a Pitchfork | 9% |
| Drone Specialist | Drone collection without buying a Drone first | 1% |
| Pack Mule | Carrying more hay between sales | 25% |
| Hay Merchant | Earning more cash from each hay sale | 14% |
| Prospector | Finding more Diamonds while collecting hay | 3.9% |
| Starter | Learning the game before you get a useful passive | 40% |
Start with the tool you expect to use or the limit you keep running into. A rare roll can have a useful specialty without being the best fit for your next haystack clear.
What Makes Each Class Worth Using?
Ultimate Farmer: Best Overall
Ultimate Farmer brings every other class’s bonuses together. That includes extra bag capacity, higher hay sale value, improvements to the Pitchfork and Dynamite, Drone benefits, and more opportunities to find Diamonds. You get help with several parts of the run from a single class.
That flexibility is its biggest strength. Extra carrying space and sale income help while you gather money, and the tool bonuses stay useful as you move on to a Pitchfork or Dynamite. You don’t have to build the whole run around one narrow effect. Golden Harvest can also activate occasionally, giving you another bonus on top of the combined passives.
With a 0.1% roll chance, Ultimate Farmer will be a rare find. Use it if it is available to you, but keep playing with a class that helps your current setup while you work toward it.
Demolitionist: Best for Dynamite Runs
Demolitionist gives Dynamite a 20% larger blast radius and a 10% chance to split into three mini charges. The wider blast reaches farther into the pile, while the extra charges can help an explosion do more work. Dynamite knocks hay loose onto the ground, letting you clear sections of the pile with less reliance on bag capacity. These bonuses are especially useful when explosions handle most of your clearing.
The important condition is having Dynamite to use. Demolitionist does not replace the need to obtain the tool. You can get Dynamite during a run, or use the permanent tool if you already have its gamepass. If you are still collecting by hand and saving for it, your class bonus is waiting on that purchase.
For solo play, favor Demolitionist once you can put Dynamite to work. If you need help reaching that point first, a class that improves your current collection or income can give you a more immediate benefit.
Forkmaster: Best for Pitchfork Players
Forkmaster makes each Pitchfork swing collect 25% more hay and cuts Pitchfork upgrade costs by 25%. The first bonus gives each swing a larger payoff. The second leaves more of your cash available for further upgrades as you keep improving the tool.
Those effects work well together when the Pitchfork is your main way of clearing the pile. You pay three quarters of an upgrade’s usual price, then collect more hay with the tool you just improved. That makes Forkmaster especially useful when you plan to keep investing in the Pitchfork through the run.
Choose it when you are using a Pitchfork or are about to obtain one. If your plan changes and Dynamite takes over most of the clearing, the class that improves your explosions becomes the more relevant option.
Drone Specialist: Best for Drone Collection
Drone Specialist gives you a Drone while you use the class, so you can get its collection help without buying one first. The Drone flies 30% faster and carries 40% more hay. It can move between collections more quickly and transport a larger load while you continue working through the run.
A three-Drone work swarm can also appear occasionally. Enjoy the extra help when it arrives; the Drone you already have is the steady reason to use this class.
Pick Drone Specialist when you want support collecting and moving hay. If your immediate goal is to make your own Pitchfork swings or Dynamite blasts more effective, their dedicated classes address that goal more directly.
Pack Mule: Best When Your Bag Keeps Filling
Pack Mule increases the capacity of every bag by 50%. You can carry more hay to the cow on each trip, which means fewer stops to sell during manual collection. It is an accessible early choice when your bag fills before you feel ready to leave the stack.
The bonus continues to apply when you change bags, so its usefulness depends on whether capacity is still interrupting you. If you regularly hit a full bag and spend time returning to sell, extra space helps. If gathering the hay takes most of your time before the bag fills, a bonus to the tool you use may do more for that part of the run.
Already have infinite hay capacity? More capacity does not remove another limit, so choose a class with an effect you can still benefit from.
Hay Merchant: Best When You Need Upgrade Money
Hay Merchant earns you 20% more money from selling hay. Each load brings in more cash to put toward your next tool or upgrade, making it useful when you can collect reliably but keep waiting to afford a purchase.
The benefit arrives at the sale. It does not increase the hay from a swing or make room for a larger load. That gives you a clear way to compare it with Pack Mule: Hay Merchant makes the hay you sell worth more, while Pack Mule lets you carry more hay to the sale. Favor Hay Merchant when cash is the obstacle between you and the next useful upgrade.
Prospector: Best for Extra Diamonds
With Prospector, Diamonds appear 50% more frequently while you collect hay, and the class can also turn hay into Diamonds. Keep it in mind when those extra resources are the main reason you are collecting.
Its purpose is different from a tool bonus. More Diamond opportunities add value to the hay you gather, but they do not directly strengthen a Pitchfork swing or widen a Dynamite blast. For a run focused on clearing the stack, prioritize a class that improves the tool doing most of your work. Choose Prospector when gathering Diamonds matters more to you.
Starter: Use It Until You Have a Useful Bonus
Starter is the default class and has no passive bonuses. You can learn the collect, sell, and upgrade loop with it, so you do not need a rare class to get started.
Once you have access to a class whose effect helps your run, take advantage of it. A useful passive is enough reason to move on from Starter, even if it comes from a common roll.
How to Get Classes and Decide When to Spin
Go to the Classes station in the lobby and use Gems to spin for a class. A spin costs 40 Gems; check the price and roll chances shown in your menu before spending.
At that price, 200 Gems pays for five spins, and 400 Gems pays for ten. Those balances buy attempts, not a guaranteed class. Set a Gem budget before you start chasing a rare result, especially Ultimate Farmer with its 0.1% chance. Treat it as a longer-term goal instead of delaying your next run until you roll it.
Look through the classes currently available in your menu before spending again. If one already fits the run you want to play, put it to use. Another spin is optional, and the comparison above can help you decide what improvement you are actually hoping to get.
Before spinning again, check whether your current class will be replaced and whether you can use it afterward.
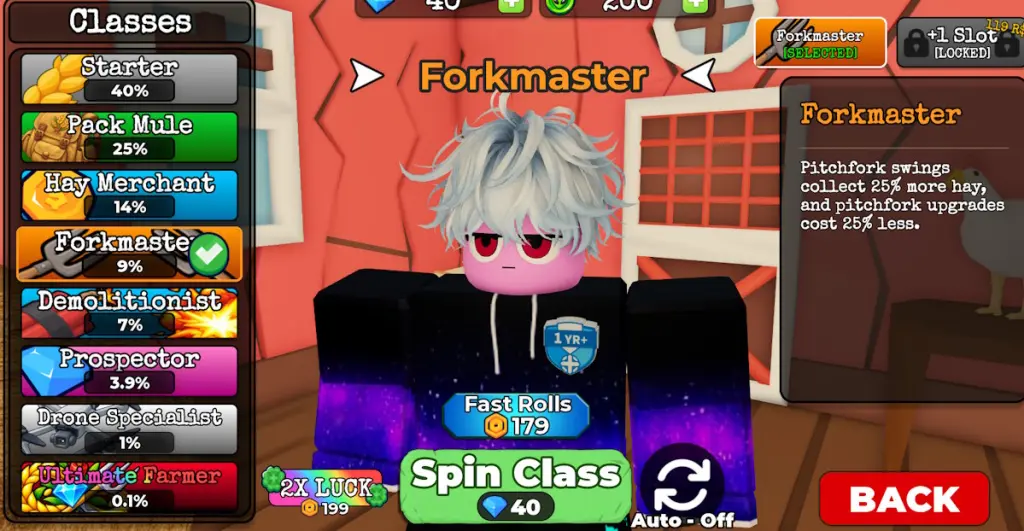
Class menu image unavailable. The class table and spin instructions above are still available.
The Classes menu shows the selected class, its perk, the roll chances, and the Spin Class button.
For more about the class system, continue to the Classes guide.